
Our Guide to Growing Pole Beans
Pole beans are members of the legume family. They are easy to grow but require trellising, either with horizontal support (such as a cattle fence panel) or vertical support (such as a bean teepee). Keep in mind if using wire panels as trellises, although pole beans are natural climbers, they don’t interweave between the wire; you’ll need to train them or attach rope to help them climb the panels. However, we don’t recommend just setting posts and stringing rope between the posts as adequate support for these heavy plants. Some people mimic the historical practices of Native Americans, and use corn as a trellis for beans. We haven’t had as much success with this method, but if you decide to try it, make sure to plant the corn about 3-5 weeks ahead of your beans; otherwise, the beans will quickly choke out the young corn.
Pole beans are sweeter and starchier than bush beans, so they have more flavor, and they have a longer harvest window. They are also easier on your back than bush beans because they can be harvested upright due to the trellising. Another fact to keep in mind is that all beans do a great job of replenishing Nitrogen into the soil.
SITE: Full sun, but can tolerate very light shade.
SPACING/HOW MUCH TO PLANT: 15 plants per person (or 5 lbs.), spaced 8-9 inches apart each way; if in rows, a minimum of 13 inches row gap. A 10 ft. row should yield 5 lbs. of snap (fresh green) beans.
SOIL: Average, well-drained soil. Prefers pH in the 5.8-7.0 range (slightly acidic to neutral).
NUTRIENTS:
PLANTING BEANS: Before planting the first bean, choose your site and construct the trellising. Make sure it is very sturdy, as pole beans become extremely heavy when vines mature and beans start to form. It’s also very beneficial to soak the bean seed for about an hour in slightly warm water, and then place the drained seed in a carton with a warm, wet towel lining the bottom. Hang a drop light over the carton overnight to keep the temperature in the 80s; this will prime the germination process. Although this is not necessary, it does give your seeds an optimum start. After 8-10 hours under the heat, remove the seeds from the priming carton. The seeds will be swelled as the germination process has been initiated, but there won’t be any radical emerging yet. If planting rows and using horizontal trellising, cut 1” deep furrows and plant a seed every 2-3 inches. Later, you’ll thin by clipping weaker bean plants at the soil line so that there remains 8-9 inches between them. If you opted to start seed indoors, transplant the young beans to your site, placing them 8-9 inches apart in the rows. If you’re planting pole beans on teepees, sow 4-6 seeds 1 inch deep around each leg of the trellis, with each leg of the teepee at least 24 inches apart. Later, thin to 1-2 plants at each leg. When bean plants begin to vine up the trellis, sow leafy greens to act as mulch or apply another source of mulch for the bean roots. Beans like cool, moist soil at their roots. Even though there is a long harvest with pole beans, you may still want to succession plant your bean crop all summer (planting every two weeks) with the final fall planting in August, so that you’ll enjoy a steady supply of fresh beans all season.
FEEDING BEANS: Other than adding a little organic fertilizer if needed at the initial planting, pole beans seldom require any supplemental fertilizer.
WATERING BEANS: Pole beans respond well to drip irrigation, which saves water and is a very effective way to prevent foliar diseases. Deep-cycle irrigation is preferred, because short, numerous irrigations promote soil disease on stems and roots. If no irrigation is used, plan to water your beans at the base of the plants 3-4 times a week (rain counts), being careful not to splash the foliage.
HARVESTING: Gather pods before they fill with seeds. Pick often to encourage production all season.
CROP ROTATION: You’ll want to refrain from planting in the same spot you had fruit bearing crops in the previous season. A good plan for crop rotation is the legume group (beans, corn, peas), followed next year by the root group (such as carrots), with fruit bearers (tomatoes) next, and finally leaf crops (such as spinach). The fifth year, the site will be ready for the legumes again. Crop rotation helps replenish certain nutrients depleted by previously grown crops, and also cuts down on disease and pest specific to the plant families.
COMPANION PLANTS:
NONCOMPATIBLE PLANTS:
DISEASES/PESTS and SYMPTOMS:
COMMON PROBLEMS and CAUSES:
Pole beans are sweeter and starchier than bush beans, so they have more flavor, and they have a longer harvest window. They are also easier on your back than bush beans because they can be harvested upright due to the trellising. Another fact to keep in mind is that all beans do a great job of replenishing Nitrogen into the soil.
SITE: Full sun, but can tolerate very light shade.
SPACING/HOW MUCH TO PLANT: 15 plants per person (or 5 lbs.), spaced 8-9 inches apart each way; if in rows, a minimum of 13 inches row gap. A 10 ft. row should yield 5 lbs. of snap (fresh green) beans.
SOIL: Average, well-drained soil. Prefers pH in the 5.8-7.0 range (slightly acidic to neutral).
NUTRIENTS:
- Nitrogen: Side dress only as needed, and only after heavy bloom and pods are set. Beans produce their own nitrogen, so great care needs to be taken to prevent too much of this nutrient in the bean’s soil.
- Phosphorus: Essential for healthy roots. Your soil likely has enough already, especially if you have previously amended with well composted manure.
- Potassium: Essential for flower and pod growth; your soil likely has enough of this nutrient, as well.
- Magnesium: Essential for foliage; likely no need to amend your soil.
- Calcium: Essential to strengthening the cell walls, which in turn helps protect against diseases. Again, the low levels required by beans means that your soil likely contains enough calcium without the need to add more.
PLANTING BEANS: Before planting the first bean, choose your site and construct the trellising. Make sure it is very sturdy, as pole beans become extremely heavy when vines mature and beans start to form. It’s also very beneficial to soak the bean seed for about an hour in slightly warm water, and then place the drained seed in a carton with a warm, wet towel lining the bottom. Hang a drop light over the carton overnight to keep the temperature in the 80s; this will prime the germination process. Although this is not necessary, it does give your seeds an optimum start. After 8-10 hours under the heat, remove the seeds from the priming carton. The seeds will be swelled as the germination process has been initiated, but there won’t be any radical emerging yet. If planting rows and using horizontal trellising, cut 1” deep furrows and plant a seed every 2-3 inches. Later, you’ll thin by clipping weaker bean plants at the soil line so that there remains 8-9 inches between them. If you opted to start seed indoors, transplant the young beans to your site, placing them 8-9 inches apart in the rows. If you’re planting pole beans on teepees, sow 4-6 seeds 1 inch deep around each leg of the trellis, with each leg of the teepee at least 24 inches apart. Later, thin to 1-2 plants at each leg. When bean plants begin to vine up the trellis, sow leafy greens to act as mulch or apply another source of mulch for the bean roots. Beans like cool, moist soil at their roots. Even though there is a long harvest with pole beans, you may still want to succession plant your bean crop all summer (planting every two weeks) with the final fall planting in August, so that you’ll enjoy a steady supply of fresh beans all season.
FEEDING BEANS: Other than adding a little organic fertilizer if needed at the initial planting, pole beans seldom require any supplemental fertilizer.
WATERING BEANS: Pole beans respond well to drip irrigation, which saves water and is a very effective way to prevent foliar diseases. Deep-cycle irrigation is preferred, because short, numerous irrigations promote soil disease on stems and roots. If no irrigation is used, plan to water your beans at the base of the plants 3-4 times a week (rain counts), being careful not to splash the foliage.
HARVESTING: Gather pods before they fill with seeds. Pick often to encourage production all season.
CROP ROTATION: You’ll want to refrain from planting in the same spot you had fruit bearing crops in the previous season. A good plan for crop rotation is the legume group (beans, corn, peas), followed next year by the root group (such as carrots), with fruit bearers (tomatoes) next, and finally leaf crops (such as spinach). The fifth year, the site will be ready for the legumes again. Crop rotation helps replenish certain nutrients depleted by previously grown crops, and also cuts down on disease and pest specific to the plant families.
COMPANION PLANTS:
- Corn (symbiotic: provides a trellis for the beans, and beans attract beneficial insects that prey on corn pests)
- Squashes (symbiotic: acts as a living mulch for beans, and beans provide Nitrogen for the squash)
- Rosemary & Nasturtium (repels beetles) [leaves are good in salads]
- Leafy Greens (shades the soil at the base of the bean plants and acts as a mulch)
- Marigold (repels Mexican Bean Beetle)
- Potatoes (repels Mexican Bean Beetle)
NONCOMPATIBLE PLANTS:
- Onion Family [includes onions, chives, garlic, leeks]
- Beets
DISEASES/PESTS and SYMPTOMS:
- Bean White Mold (first observed as wet, soft spots or lesions on leaves during or just after the full bloom flowering period; evolves into rotted areas that develop a white mold; later develops into a darkened, hard masses about the size of mustard seeds and resembling mouse droppings) [soil borne; enhanced by prolonged leaf wetness due to improper watering, or a combination of cool, moist weather with high humidity; also enhanced by lack of spacing/ventilation due to plants too close together or high nitrogen content in the soil causing abundant leaf growth]
- Anthracnose (leaves, stems and pods develop reddish brown or black sunken lesions or round to angular streaks; in moist weather, pink spores may also appear; infected leaves will also develop blackened veins on the underside; pods may shrivel) [mostly a seed borne disease, but can be spread by people, animals, tools, wind; enhanced by improper watering, because it favors a warm, moist environment; check seedlings for lesions when the cotyledon and stem first emerge during germination; bacterial blight is sometimes confused with anthracnose in the early stages]
- Mosaic Virus (light green or yellow mottling between veins on leaves on young plants, stunted growth, reduction in pod production, leaves may curl) [seed borne disease, but can also be spread by aphids]
- Bean Rust (begins as tiny white blisters under the leaf resembling spider mite infestation---but without the webs---which eventually evolve into orange-brown blisters/pustules; badly affected leaves will turn brown and drop off; pods may also develop rust) [wind borne fungus; most prevalent in the heat and humidity of summer; different than anthracnose in that no lesions develop]
- Bacterial Blight (small brown spots on leaves surrounded by yellow halos; may have wet spots on pods; enhanced by long periods of high humidity or improper watering)
- Curly Top Virus (leaves pucker downward, veins turn purple; plant becomes stunted; pods are small and yield is low) [spread by leaf hoppers]
- Powdery Mildew (white/chalky spots form first on the tops of the leaves, rapid spread of affected areas, leaves turn yellow then die and drop off, reduction in fruit yield, poor flavor in mature fruits) [wind borne fungus; rare in pole beans, but possible; spread is enhanced by crowded conditions and over fertilizing the soil]
- Thrips (insects that attack the bean at any stage of develop but is most harmful during the flowering stage; damage to pods is scarring that causes the bean to twist and curl and have mildly rough patches; leaves may also develop silvering; they will also leave small white larva on the underside of leaves; during the flowering period, randomly collect 20 blooms and dissect to check for presence of thrips)
- Grasshopper (prevalent in early spring to early summer; cause significant damage by eating leaves; easily identified)
- Cutworm (moth caterpillar that feeds at night or on very cloudy days; primarily feed on roots and foliage of young plants, and will even cut off the plant from underneath the soil; causes rapid damage; eggshells, coffee grounds and food grade Diatomaceous Earth applied at the base of the plant will deter cutworms)
- Mexican Bean and Japanese Beetles (feed on the underside of leaves to give them a lacy appearance, as all that’s left is the ‘skeletal’ structure of the leaf; this interferes with photosynthesis; beetles may also feed on the stems and pods)
- Aphids: (suck the sap from the plant leading to stunted growth/curled leaves/scalded fruit, also leaves a trail of honeydew---a sticky substance that can lead to sooty mold on the bean plant)
- Slugs and Snails (damage leaves and stems; leave behind a slimy trail)
- Wireworm (lives in soil; eats the roots which results in wilting or stunted growth; roots have knots or beads; telltale sign of infestation is sporadic damage throughout the garden)
- Leaf Hopper (feeds on leaves; veins will pale, leaves will curl and crinkle, then turn brown; sometimes there is a v-shaped brown tip on the leaf; mimics damage caused by aphids; leaf hoppers are most active from early June to August)
COMMON PROBLEMS and CAUSES:
- Blossom Drop (flowers fall off instead of setting pods) [excessive heat above 90 degrees, dry winds, variety of bean—not suited for your area, or an overly susceptible variety to blossom drop, such as Blue Lake or Kentucky Wonder]
- Few Flowers/Bean Pods (large, green vines and foliage with few beans developing) [too much Nitrogen in soil; not harvesting pods enough]
- Leaves Wilted/Stunted Plants (rule out pests/disease) [soil issues: too wet or dry, or not fertile]
Our Favorite Heirloom Pole Beans:
|
Goose Bean: 80 days
Vigorous pole beans. Great for green shell, snap and canning. Large green and pink pods, large brown seeds. |
|
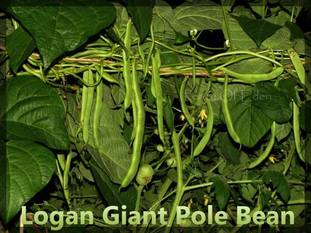
Logan Giant: 70 days
Highly productive, 4-6 inch pods with medium sized brown beans (some with occasional darker spots). Excellent flavor; great for snap beans, canning & drying. |
