
Basic Chicken Care
Our Guide for Raising Chickens Successfully
1. Acquiring Chickens
2. Chicken Housing
3. Nutrition & Basic Care
4. Breeding & Raising Chickens
5. Processing Chickens
6. Common Chicken Ailments
1. Acquiring Chickens
2. Chicken Housing
3. Nutrition & Basic Care
4. Breeding & Raising Chickens
5. Processing Chickens
6. Common Chicken Ailments
Acquiring Chickens
Before you bring the first chicken home, do your research. Find breeds that catch your eye, then research them to see if they meet your needs and hopes. Do you want chickens strictly for egg production? Meat? Dual purpose? Will you want to raise your own chicks? Will you be free ranging, pasturing or confining your birds? All these are important questions you should have answered before acquiring your flock. When we first became interested in raising chickens many years ago, we started with a flock that consisted of several breeds to get a feel for which ones worked for us in terms of productivity, growth, temperament, and ability to forage successfully. We had not yet decided on using only heritage or rare breeds for our flocks, and we acquired our birds from a few breeders, but mostly from hatcheries, which we do not recommend---more on that later. We had a flock consisting of Wyandottes (Silver-Laced, Blue-Laced and Gold-Laced), Buff Orpingtons, Black Copper Marans, Welsummers, White Leghorns, Barred Rocks, Rhode Island Reds, New Hampshire Reds, Australorps, and Jersey Giants. We narrowed our flocks down to Orpingtons, Black Copper Marans, Welsummers, and New Hampshire Reds rather quickly, finding the other breeds not to our satisfaction. In 2008, we decided to overhaul our chicken program and acquire the best bloodlines we could find for our foundation flocks. In the process, we did some research on the Delawares and decided to replace the New Hampshires with them. We also discovered the Barnevelders during this time. In 2012, we added the Dominiques, in part because of their qualities, but also because of nostalgia; they are the breed Kate's great grandfather raised exclusively. She has fond memories of him and his rose-combed, prized hens. We also decided to phase out the Black Copper Marans and Welsummers, although we still feel they are very nice breeds, we wanted to naroow our focus to four main varieties. All the breeds we chose to promote and conserve possess good foraging ability, good temperament, and reproduce naturally. These traits are extremely important to the sustainable farmer. To us, sustainability is measured by how well you can produce for your needs with as little outside influence and as little impact on the total environment as possible. Our breeds are dual purpose and easy keepers, and they do have some degree of broodiness. Some are better egg layers, but can produce a moderate amount of meat for the table (Barnevelders); others are meatier but still lay decently (Dominique, Orpington) . Our Delawares are the most equally producing (meat and eggs) and do mature rather quickly. In 2018, we're contemplating adding a pastured meat breed, the Light Brahma, to experiment in its market value for meat production.
If you're acquiring older pullets/cockerels or adults, use caution. Anyone who keeps or breeds chickens responsibly will have to cull unproductive birds from time to time. Make sure you are not buying culls. An ethical breeder won't sell you inferior older birds. We typically only sell chicks or young pullets, so assessment at that age is difficult. But we try to only sell those chicks that are free of obvious defect and which seem vigorous. We don't want inferior birds to carry our reputation, after all. If you purchase from hatcheries, be aware they are usually not breeding to improve their birds and that hatchery conditions and practices are really not conducive to healthy, hardy chicks. A reputable breeder will offer birds that have better immune systems and are better representatives of their breed---not just in looks, but in terms of productivity as well. If it looks good but isn't productive, it isn't much benefit to the sustainable farmer. Another word of caution, breeders who are only interested in producing exhibition birds likely aren't paying attention to the functionality of the breed, and may not offer worthwhile birds for sale. Do your homework, question the breeder before you buy. If you want a bird for your homestead, purchase from farmers who are using that breed to help sustain themselves, while still breeding for the standard.
If you have the chance to buy older birds, look for hens whose keel (breastbone) points downward and whose pelvic bones are about three fingers width apart. You also want a large space between the keel and pelvic bones, so look for a hen who is more blocky or square in appearance with good length from breast to pelvis. Younger hens have smaller, redder combs, than older hens, and they should be bright-eyed and active. Point of lay for heavier breeds is about 6-7 months old, and the most productive years are from point of lay to around 3 years. Heritage breeds are well known for producing until age 5, but their egg production does decline in those later years. Still, if you're looking to raise your own chicks, you should be able to get a good start at a cheaper cost by purchasing older hens. Just be certain the seller is honest about the hen's age and the price reflects her years.
Of course, if you buy chicks from a breeder that are less than 3-4 weeks old, you'll most likely be purchasing unsexed birds. But if you are purchasing birds a little older, there are a few tricks that can help determine cockerel from pullet. Keep in mind these are not foolproof methods. We don't vent sex chicks on our farm, so we rely on these tricks and years of experience in working with our breeds. Cockerels will feather later than pullets; often you'll see a cockerel with lack of tail feather development and downy still on the neck by 4-6 weeks of age. Their combs will usually be darker and more developed than the pullets---although our Delaware hens have more pronounced combs than the other breeds, and sometimes they can fool you at an early age. Our Orpington cockerels, on the other hand, develop combs more slowly, so this tip isn't a good test for them. Generally, cockerels will have longer, thicker legs and carry themselves more boldly. Some people wave a hat over a prospective group of chicks; cockerels supposedly cluck an alarm and stand their ground, whereas pullets are reported to cower down.
Some breeds are sexable by color. Our Dominiques, Delawares, and Barnevelders lend themselves to this ability, to varying degrees. Dominique cockerels are lighter in feather color than the pullets. At hatch, the pullets usually have darker legs, smaller yellow spots, and more pattern to the spots. Cockerels will have frostiness, scattered spotting, and lighter legs. These traits will disappear, though, as the chicks age. After 4-5 weeks, our Delaware cockerels will have more black in their feathering than the pullets. Our Barnevelder pullets will have more well-defined lacing than our cockerels have.
A final note on purchasing chickens concerns biosecurity. After making sure to buy from reputable sources, you should still plan to quarantine your new birds, even if you don't have any other birds already on your property. This is because if your new birds should have a contagious disease, you won't be allowing them access to the rest of the property to possibly spread it to the soil and thereby cause future issues. A two week minimum quarantine should be observed; we prefer a month of quarantine.
Chicken Housing
 © Peace Of Eden, LLC
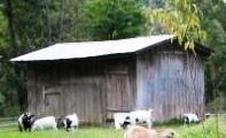
Chicken housing is a broad subject, as there are many different choices. Some of our birds prefer no housing at all. They roost in an oak tree inside the paddock under the watchful eyes and nose of our LGD. Others prefer to roost in the goat barn. We do have a hen house outside of the main pasture. It houses a mixed flock that consists of hens not selected for our breeding pens, as well as odds-and-ends hens (such as a couple of Golden Comets given to us by a friend who couldn't keep them, and the Cochins and a Chantecler who work as brood hens for us). It is secure and predator proof when closed. We also have a broodflock house where we keep our breeding birds so they can be penned separate during the hatching season to ensure we get purebred eggs. It's also predator proof.
Here are some comparisons of our two poultry houses for your consideration:
The Hen House is an old 12 X 20 foot building sitting on block with a tin roof, wood floor, and wood sides. It has a normal-sized door for people and a smaller door for the birds to use. It has two large windows for ventilation. It has a large roost area and commercially made nest boxes. It requires the use of bedding (we prefer pine needles and leaves). It's snug in the winter if we cover the windows. It does invite rodents, with many places for them to hide, however. It's also hard to sanitize and clean.
The Broodflock House is a 12 x 16 foot building raised 3 feet from the ground, with a tin roof, a wire floor, and wood sides. Inside, it's divided with wire into four 6 x 8 foot sections. It's recommended that you provide at least 3 square feet per bird, so each section would comfortably house up to 16 average sized birds. We usually keep 12-13 hens and 2-3 roosters in the breeding pens; the exception is the Buff Orpington section, in which we pen up to 8-9 hens with 1-2 roosters. Each section has a large roost, a 2 x 2 foot door (yes, we have to crawl up into the house if we need to work there), and 4 nest boxes which hang on the outside of the building so that eggs can be gathered from outside. There's no need for bedding because droppings fall through to the ground below, where they can be utilized for compost. Birds have no access to their own droppings while inside the house. The house can be quickly and easily sanitized, as well. There is also less space for rodents to hide and dwell. Concerns with using this style housing year round would be draftiness due to the wire floor and harshness of the floor on the birds' feet (although when given an exercise pen or daily turn out, the birds really only go into the house to lay eggs or roost). This style is best suited, therefore, as a temporary house during the breeding season.
We have hopes of eventually building a portable coop on an old boat trailer frame, so that we will be able to move some birds out to a more remote area of the farm for pasturing. We would invest in a timer to operate the door and train the birds to go into the coop before dark. We plan to use portable electric poultry netting and a solar charger to help keep predators out and the birds in as we move them around the pasture.
Currently, we raise all chicks in portable tractors that we move daily to fresh ground. These tractors are heavy wire topped with a wooden roof and are low to the ground. We give the chicks small shelters inside the tractor and also place roosts for them. We keep them in fairly close proximity of the house for added protection from predators. We did have a raccoon reach through the wiring once to grab an older chick from the roost, but it wasn't able to kill the bird. The chick did end up with some scarring, though.
Nutrition and Basic Care
An important starting point: never feed spoiled or moldy feed to your chickens. Make sure your chickens get plenty of fresh greens (weeds, vegetables, grass) daily. This is a challenge in winter, of course, but there are a few options you have that will satisfy this requirement (more on this below). And always provide fresh clean water to your flocks---birds dehydrate surprisingly quickly.
Starting at 2 days old, our brooded chicks are given quality chick start. On day three, we begin sprinkling grit over their feed (much like salting food). When the chicks are 2 weeks old, we begin switching them to organic wheat and whole oats, and continue the grit. We also offer them bits of greens from the yard and garden. We don't use pesticides on our farm, so we are able to offer these in confidence. We do recommend adding Apple Cider Vinegar (ACV) with the mother in it. It adds probios and vitamins to their diet.
The best choice for growing chicks is access to grass and insects via a chick tractor. We raise our chicks in tractors as soon as they feather and no longer require a heat source (around 3-4 weeks old). We continue to supplement with wheat and oats, but the bulk of their diet is foraged within the confines of the tractor, which is moved to fresh ground daily.
The best choice for adult chickens is free ranging; however, some farmers cannot provide this due to predators and other restrictions. Also, the birds will need to be fed in the winter months, even if one free ranges or pastures his poultry. Layers need added calcium, which they find while foraging; if, however, you cannot turn your birds out, you'll need to provide oyster shell or crush the hens' used egg shells and feed them back to them. DE (diatomaceous earth) can also be added to rations; it's very high in calcium. Just be certain to use food grade from a feed store. Sidenote: If you buy commercially prepared laying mash, do not feed it to chicks. The added calcium will damage their kidneys.
We've been researching the nutritional needs of chickens and believe we have an appropriate nonGMO formula for our flocks. Some of the ingredients can be grown and harvested on our farm, thereby increasing our sustainability.
3 parts organic red wheat, fermented
3 parts organic whole oats, fermented
3 parts wild bird seed with BOSS [black oil sunflower seeds]
1/4 part food grade Diatomaceous Earth (not for pools)
1/4 part livestock trace mineral salt
1/2 part grit (if the birds cannot be pastured/ranged)
sprouted seed (see directions below)
table scraps/old milk
oyster shell offered separately
*for mixing 100# of feed, one part=10#.
We'd like to add quinoa, non GMO corn, and flax to this mix, and we plan to grow them ourselves next season. We would phase out the wild bird seed and replace it with quinoa, corn, flax and BOSS grown on our farm. If you can find kelp, that is also a good additive.
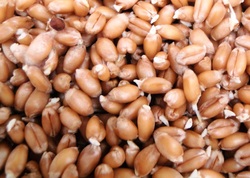
Sprouting grains is a good way to feed chickens in the winter. It gives more nutrition to them than traditional grain mixes. It's very simple to do and requires about 4-5 days from start to finished product. It does, however, take a bit of time and effort on the producer's part.
Sprouting Instructions:
1. Fill a container 1/3 full of grains (a quart jar should produce enough sprouts for 6 chickens if you're supplementing with traditional grain mixes)
2. Soak grains overnight in water (dechlorinated water works best for germination). This is the only time the grains should be immersed in water.
3. Drain well and store in a dark area (cabinet shelf, for example); continue to rinse wheat daily, letting as much water as possible drain out to allow sprouts to grow. It usually takes 3-4 days for the grains to sprout enough to feed the birds.
4. Place the container near a sunny window on the 3rd or 4th day so the sprouts will produce chlorophyl.
Start new batches daily to keep a constant supply of sprouts for your flock.
Breeding and Raising Chickens
 © Peace Of Eden, LLC
In late January/early February we begin to assess our flocks to choose the best representatives of each breed and the most vigorous birds for the breeding pens.
Our goal is to have hatching eggs by March; in order to do that, we must ensure the eggs will hold purebred chicks and that the eggs are fertile. We wait three weeks after penning our breeds separately before we collect the eggs for hatching. A hen is usually able to store viable semen from a rooster for around 14 days; since sometimes the semen is viable longer, we wait an additional week before feeling confident the hen's eggs are sired by the roosters we've placed with her in the pen. We then gather eggs to test for fertility on our farm before we can offer hatching eggs for sale. This takes an additional 21 days; even though we candle, we don't "count our chickens before they hatch". We also want to be sure our chicks are healthy and lively at hatch before offering hatching eggs or taking orders for chicks. After fertility of eggs and vigor of the chicks is determined, we keep our incubators going continuously, as well as capitalize on any opportunities of broody hens at the Henhouse.
Fertility and hatchability of eggs are influenced by the management of the flock. For top quality eggs, breeding poultry must be in great health, have a correct diet, and be managed with a very minimum of a dozen hens per rooster ratio.
The laying conditions/environment also affect hatchability. We begin with clean, fresh eggs. We will occasionally rinse an egg quickly with water that's warmer than the egg, but we avoid washing hatching eggs with soap. Washing eggs reduces their viability by removing the protective bloom, which then provides opportunity for germs to penetrate the shell and infect the egg.
We try to collect eggs frequently during the day as much as possible, and we date stamp them and store them pointed end down in a rotating egg holder so that the embryo is exercised. 65 degrees is an ideal temperature for storing eggs until you're ready to set them. We don't sell any hatching eggs that are older than 3 days, but an egg should theoretically be viable for 7-14 days; obviously, the fresher it is, the more hatchability it will have, so we rarely set an egg that's older than 5 days. It's a good idea to lightly mist the eggs daily as they are stored; optimum humidity levels for storage are 60%-75%. If you travel to acquire your eggs, or if you have them shipped to you, always allow the eggs to 'rest' with pointy end down at room temperature for 24 hours. This will settle their air cells before you set them in the incubator. Locate your incubator in a room where it is out of direct sunlight, away from drafts and shielded somewhat from outside temperatures by being placed on an inside wall. Ideally, room temperature should be a reasonably steady 70 to 75° F.
You should run your incubator at least 24 hours before setting the eggs. Check your incubator temperature at the center with an accurate thermometer (the thermometer that may be supplied with your incubator may not be accurate). Once the temperature in the incubator has stabilized to the manufacturer's specifications (usually 99.9 degrees), allow any stored eggs to warm gradually to room temperature before putting them in, to avoid the eggs from sweating and providing an opportunity for germs to enter the shell. Set your eggs in the incubator either on their sides, or pointy end down. Ideally, you'll have an automatic egg turner; if not, you'll have to hand rotate the eggs at least twice daily. Incubation takes 21 days for chickens; some breeds will hatch a day early or late (our Delawares consistently hatch on day 20). Temperature will also significantly affect the hatch. Low temperatures will delay the hatch or may cause crooked toes; temperatures lower than 96 degrees for a sustained amount of time can kill the embryo. Likewise, temperatures that are too high can cause problems. 105 degrees can kill embryos in under 30 minutes; chicks are unlikely to survive temperature at/above 103 degrees for a sustained amount of time. High temperature can also result in chicks that hatch too early and are therefore undersized, chicks that die in the shell just before hatch or during early pipping, and chicks that are sticky or malformed, or that have bloody navels .
Humidity is the second most important factor when incubating. The humidity of the incubator environment affects how much moisture is lost by the incubating eggs during incubation. The more humid it is, the less moisture is lost from the egg, meaning the less weight is lost from the egg. Weight loss between laying and pipping should be between 13 and 15%. For hatching chickens, desirable humidity during the first 18 days of incubation is around 50 to 55% relative humidity. Raise to 65% - 70% relative humidity for the final 3 days prior to hatching. The higher humidity levels at this time keep the egg membranes soft and easy for the hatching chickens to escape from.
On day 18, most people stop turning the eggs to let the chick settle and orient itself in preparation for the hatch. It's advisable to minimize opening the lid during this time. We increase the humidity and oxygen inside the incubator using a reptile humidifier with a tube inserted into the incubator. Some people simply add more luke warm water to the trays. Bear in mind, however, that you have to compensate for exceedingly dry or humid climatic conditions where the incubator is running. Incubator management thus varies season to season. For very dry conditions, you can boost humidity using small pieces of damp sponge. Under very humid conditions, humidity can be reduced by covering part of the incubator’s water tray with aluminum foil, taped into place.
Pipping is when the hatching chicks begin to peck through their shell. It can take up to six hours for the chick to fully emerge, and a further six hours for it to dry, fluff up and begin to move about. Since the chicks have reserves of yolk to draw on, they don’t need to eat or drink for the first 24 hours after hatching and can be left in the incubator until the stragglers have had a chance to hatch. Any that haven’t hatched within 24 hours of the first hatching are usually weak and unhealthy.
Something to remember: If incubator management is good, and only top quality fertile eggs have been used, the best hatching rate you can usually expect is 85%. If you received eggs in the mail, 50% hatching is good.
It is surprising just how thoroughly dirty your incubator will be after hatching. Poor sanitation between batches of incubating eggs can result in infection and death during incubation or after the hatch. We maintain a separate incubator to hatch out the chicks. This allows us to set another batch 5 days sooner than if we hatched in the same incubator we set the eggs in, and it allows the setting incubator to stay cleaner. To disinfect between setting clutches of eggs, we gently clean the top part of the incubator with soap and water on rags, spray with vinegar, and allow the incubator to dry in the sunlight, which is a natural disinfectant. Be careful not to get any electrical parts wet. The water trays are generally very dirty after a hatch. We use vinegar and sunlight to disinfect them after a good soak in soapy water.
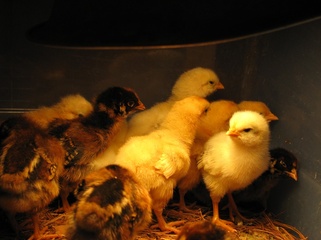
Once dry the chicks can be moved to a brooder . For the first week, we keep the chicks in a brooder box, which we constructed from a large plastic tote. We cover the tote with wire and securely suspend a clamp light about 6 inches from the floor of the brooder. We recommend using a cage over the clamp light in case it would happen to come loose and fall to the litter; the cage would prevent the light bulb from contacting the litter and starting a fire. We also recommend using a red bulb to minimize chicks pecking at each other. We use shredded paper for litter and change it as needed or every 3 days. We've also used pine needles or pine shavings for bedding. We like using shredded paper because it's absorbent, easy on the feet, good for the compost bin, and free (we shred our own). After the first week, we move the chicks to the brooder room and raise them on the floor. Again, we use clamp lights suspended about 6 inches from the floor. We have two in our 3 x 6 foot brooder room. Chicks will adjust themselves to the heat level they need; if you see them huddling, the temperature may be too cool. If they are spread out and lying prostrate, it's too hot. Contented chicks will chirp happily and will be relatively spread out inside the brooder, resting in normal positions. If you use a brooder box, be sure the chicks are able to move away from the heat source as needed.
After about 3 weeks, chicks usually don't need anymore heat and can be moved to the tractors to be raised on grass and bugs.
Our goal is to have hatching eggs by March; in order to do that, we must ensure the eggs will hold purebred chicks and that the eggs are fertile. We wait three weeks after penning our breeds separately before we collect the eggs for hatching. A hen is usually able to store viable semen from a rooster for around 14 days; since sometimes the semen is viable longer, we wait an additional week before feeling confident the hen's eggs are sired by the roosters we've placed with her in the pen. We then gather eggs to test for fertility on our farm before we can offer hatching eggs for sale. This takes an additional 21 days; even though we candle, we don't "count our chickens before they hatch". We also want to be sure our chicks are healthy and lively at hatch before offering hatching eggs or taking orders for chicks. After fertility of eggs and vigor of the chicks is determined, we keep our incubators going continuously, as well as capitalize on any opportunities of broody hens at the Henhouse.
Fertility and hatchability of eggs are influenced by the management of the flock. For top quality eggs, breeding poultry must be in great health, have a correct diet, and be managed with a very minimum of a dozen hens per rooster ratio.
The laying conditions/environment also affect hatchability. We begin with clean, fresh eggs. We will occasionally rinse an egg quickly with water that's warmer than the egg, but we avoid washing hatching eggs with soap. Washing eggs reduces their viability by removing the protective bloom, which then provides opportunity for germs to penetrate the shell and infect the egg.
We try to collect eggs frequently during the day as much as possible, and we date stamp them and store them pointed end down in a rotating egg holder so that the embryo is exercised. 65 degrees is an ideal temperature for storing eggs until you're ready to set them. We don't sell any hatching eggs that are older than 3 days, but an egg should theoretically be viable for 7-14 days; obviously, the fresher it is, the more hatchability it will have, so we rarely set an egg that's older than 5 days. It's a good idea to lightly mist the eggs daily as they are stored; optimum humidity levels for storage are 60%-75%. If you travel to acquire your eggs, or if you have them shipped to you, always allow the eggs to 'rest' with pointy end down at room temperature for 24 hours. This will settle their air cells before you set them in the incubator. Locate your incubator in a room where it is out of direct sunlight, away from drafts and shielded somewhat from outside temperatures by being placed on an inside wall. Ideally, room temperature should be a reasonably steady 70 to 75° F.
You should run your incubator at least 24 hours before setting the eggs. Check your incubator temperature at the center with an accurate thermometer (the thermometer that may be supplied with your incubator may not be accurate). Once the temperature in the incubator has stabilized to the manufacturer's specifications (usually 99.9 degrees), allow any stored eggs to warm gradually to room temperature before putting them in, to avoid the eggs from sweating and providing an opportunity for germs to enter the shell. Set your eggs in the incubator either on their sides, or pointy end down. Ideally, you'll have an automatic egg turner; if not, you'll have to hand rotate the eggs at least twice daily. Incubation takes 21 days for chickens; some breeds will hatch a day early or late (our Delawares consistently hatch on day 20). Temperature will also significantly affect the hatch. Low temperatures will delay the hatch or may cause crooked toes; temperatures lower than 96 degrees for a sustained amount of time can kill the embryo. Likewise, temperatures that are too high can cause problems. 105 degrees can kill embryos in under 30 minutes; chicks are unlikely to survive temperature at/above 103 degrees for a sustained amount of time. High temperature can also result in chicks that hatch too early and are therefore undersized, chicks that die in the shell just before hatch or during early pipping, and chicks that are sticky or malformed, or that have bloody navels .
Humidity is the second most important factor when incubating. The humidity of the incubator environment affects how much moisture is lost by the incubating eggs during incubation. The more humid it is, the less moisture is lost from the egg, meaning the less weight is lost from the egg. Weight loss between laying and pipping should be between 13 and 15%. For hatching chickens, desirable humidity during the first 18 days of incubation is around 50 to 55% relative humidity. Raise to 65% - 70% relative humidity for the final 3 days prior to hatching. The higher humidity levels at this time keep the egg membranes soft and easy for the hatching chickens to escape from.
On day 18, most people stop turning the eggs to let the chick settle and orient itself in preparation for the hatch. It's advisable to minimize opening the lid during this time. We increase the humidity and oxygen inside the incubator using a reptile humidifier with a tube inserted into the incubator. Some people simply add more luke warm water to the trays. Bear in mind, however, that you have to compensate for exceedingly dry or humid climatic conditions where the incubator is running. Incubator management thus varies season to season. For very dry conditions, you can boost humidity using small pieces of damp sponge. Under very humid conditions, humidity can be reduced by covering part of the incubator’s water tray with aluminum foil, taped into place.
Pipping is when the hatching chicks begin to peck through their shell. It can take up to six hours for the chick to fully emerge, and a further six hours for it to dry, fluff up and begin to move about. Since the chicks have reserves of yolk to draw on, they don’t need to eat or drink for the first 24 hours after hatching and can be left in the incubator until the stragglers have had a chance to hatch. Any that haven’t hatched within 24 hours of the first hatching are usually weak and unhealthy.
Something to remember: If incubator management is good, and only top quality fertile eggs have been used, the best hatching rate you can usually expect is 85%. If you received eggs in the mail, 50% hatching is good.
It is surprising just how thoroughly dirty your incubator will be after hatching. Poor sanitation between batches of incubating eggs can result in infection and death during incubation or after the hatch. We maintain a separate incubator to hatch out the chicks. This allows us to set another batch 5 days sooner than if we hatched in the same incubator we set the eggs in, and it allows the setting incubator to stay cleaner. To disinfect between setting clutches of eggs, we gently clean the top part of the incubator with soap and water on rags, spray with vinegar, and allow the incubator to dry in the sunlight, which is a natural disinfectant. Be careful not to get any electrical parts wet. The water trays are generally very dirty after a hatch. We use vinegar and sunlight to disinfect them after a good soak in soapy water.
Once dry the chicks can be moved to a brooder . For the first week, we keep the chicks in a brooder box, which we constructed from a large plastic tote. We cover the tote with wire and securely suspend a clamp light about 6 inches from the floor of the brooder. We recommend using a cage over the clamp light in case it would happen to come loose and fall to the litter; the cage would prevent the light bulb from contacting the litter and starting a fire. We also recommend using a red bulb to minimize chicks pecking at each other. We use shredded paper for litter and change it as needed or every 3 days. We've also used pine needles or pine shavings for bedding. We like using shredded paper because it's absorbent, easy on the feet, good for the compost bin, and free (we shred our own). After the first week, we move the chicks to the brooder room and raise them on the floor. Again, we use clamp lights suspended about 6 inches from the floor. We have two in our 3 x 6 foot brooder room. Chicks will adjust themselves to the heat level they need; if you see them huddling, the temperature may be too cool. If they are spread out and lying prostrate, it's too hot. Contented chicks will chirp happily and will be relatively spread out inside the brooder, resting in normal positions. If you use a brooder box, be sure the chicks are able to move away from the heat source as needed.
After about 3 weeks, chicks usually don't need anymore heat and can be moved to the tractors to be raised on grass and bugs.
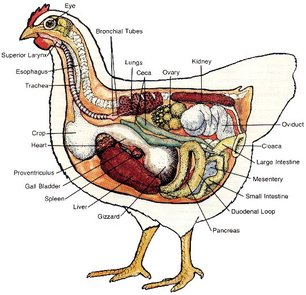
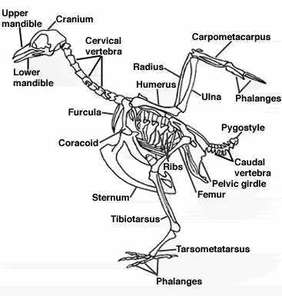
Processing Chickens
Some knowledge of the anatomy of the chicken is necessary to properly process the bird. Here are some basic diagrams courtesy of the web.
|
|
Guidelines for humanely processing chickens coming soon......
Common Chicken Ailments
 © Peace Of Eden, LLC
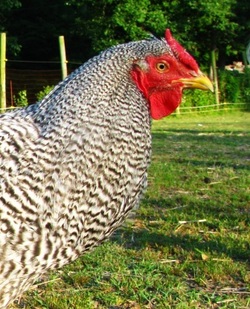
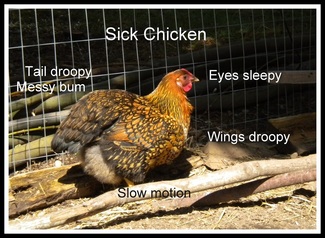
Heritage chickens are hardy animals. You're far more likely to lose a heritage bird to predation rather than illness, provided you are implementing a good biosecurity plan. Observation is a vital tool in maintaining a healthy flock. You should take the time to observe your birds daily. Below are some signs to look for in a healthy flock.
Physical Signs of a Healthy Chicken
|
Behavioral Signs of a Healthy Chicken
|
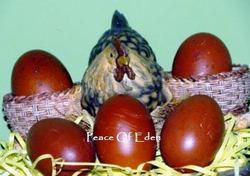
Drop in Egg Production
 © Peace Of Eden, LLC
Everyone who raises chickens will experience fluctuations in their flock's egg production at some point. A drop in egg production can be attributed to several things.
Here are some common reasons for a drop in egg production.
Here are some common reasons for a drop in egg production.
- Age of hen. A pullet should be ready to lay from 6-8 months of age. Heritage breeds are a bit slower than commercialized breeds. To know when to expect eggs from a pullet, do the two finger test by holding her with rump side up, placing two fingers between her pelvic bones at the vent. If you can get two fingers width between the bones, then the pullet is ready to lay eggs. Also, check her comb. An immature pullet will have a pale or pinkish comb; one ready to lay will have a red comb. At the other end of the spectrum is the older hen. The prime laying age for a hen is 1-3 years of age; after that, her production will start to dwindle. Heritage hens should be expected to lay until 4-5, but it will not be steady production as in her younger years. Older hens may also be broody, which will cause them to stop laying. A broody hen will lose the redness in her comb and will be "grouchy" with ruffled feathers.
- Time of year. Egg production naturally wanes with the shorter days we have in the late fall and winter months. At our farm, we allow our hens to have a natural cycle, as we feel this is healthier for the hen. Some farmers will place light in their coops to encourage the hens to lay when experiencing shorter day lengths. We would suggest you try a fluorescent or other UV type lighting, as these would also mimic sunlight to help the birds produce vitamin D.
- Molting. A hen will molt her second year and every year thereafter. Sometimes a lack of nutrition or water will send a hen into premature molt, as well. A molting hen won't lay because she's using her energy and resources in growing new feathers.
- Condition. A fat hen won't produce; nor will a malnourished hen. A diet high in corn and scraps can put a lot of weight on a hen. An underweight hen not receiving proper/balanced nutrition will not have enough resources free to produce eggs, either.
- Calcium and salt. Producing eggs requires quite a bit of calcium and some salt in the diet. We feed whole grains and add oyster shell (or sometimes shells saved from eggs we've eaten) and DE (food grade Diatomaceous Earth) along with trace mineral loose salt to our birds' diet.
- Disease. A sick hen won't lay. There are a few diseases which specifically affect a hen's egg production. Tenosynovitis is a common cause, as well as Infectious Bronchitis (IB) which can have varying symptoms and can lead to permanent damage to the oviduct, even after the bird has fully recovered. A damaged oviduct can result in misshapen eggs or thin shelled eggs. See the list of ailments document below for more information.
Preventing Illness in Your Flock
 © University of MD
Because we live by the adage an ounce of prevention is worth a pound of cure, we strongly encourage biosecurity and proper management. Feed chickens a balanced diet appropriate for their age. Foraging is best, when possible. If you coop/pen the birds, keep it fairly clean. We do not recommend keeping the coop or brooder areas impeccable, however; part of maintaining a healthy flock is to allow them some exposure to germs/etc.---how else would they be able to develop a healthy immune system? Keep things reasonably clean, but let them be birds and develop as they're designed. Food and water, however, should be kept extremely clean. Hanging feeders/waterers at the birds' chest level work well to keep droppings out of the supply. Organic matter in the water can quickly decompose and result in botulism in your birds. A constant supply of fresh, palatable water is a must; birds dehydrate quickly, and lack of water will send them into a molt and/or halt egg production. Chickens need adequate sunlight exposure and plenty of fresh air to stay healthy, also.
Here is good advice on how to assess the health of your chicken from Ohio State University:
Physical Exam for Chickens
Here is good advice on how to assess the health of your chicken from Ohio State University:
Physical Exam for Chickens
List of Common Ailments in Chickens
 © mossytrees blogspot
Below is a list of some chicken diseases and ailments you might encounter, including their symptoms and preventative measures. We want to re-emphasize that biosecurity is essential in maintaining healthy birds. Almost all ailments listed can be prevented with strict biosecurity and proper management; therefore, the reader can assume these preventative measures, as only additional measures are listed below. There are many respiratory diseases affecting chickens and they can be difficult to discern from each other; common symptoms are in black, but notable symptoms are in color.
This list is not all inclusive; for more thorough reading, we recommend Gail Damerow's book: The Chicken Health Handbook . We've found this book to be well-written and extremely thorough. There are also a few informative sites you can visit to help diagnose and treat your flock:
avianweb.com backyardchickens.com thepoultrysite.com
