
How and Why:
fermenting grains for chicken feed
If you’ve ever eaten kefir, cheese, yogurt, or sauerkraut, then you’ve eaten fermented food. These kinds of foods are very healthy for you, but why? The fermentation process uses naturally occurring bacteria to partially break down the food. It improves the enzyme content and increases the levels of vitamins B, C and K in the food. It makes the protein in the food more ‘available’ to the consumer---12% more available. In addition, fermentation also makes food more digestible.
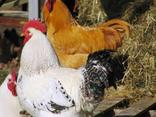
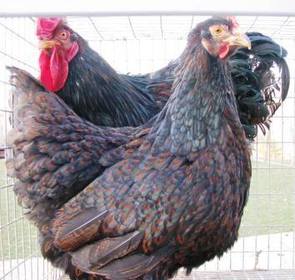
Our chickens will also benefit from consuming fermented foods. Generally, it will take a few weeks when switching from a dry diet to a fermented diet, but once the birds adjust, the benefits will be obvious. They won’t need to eat as much because they will be receiving more nutrients in smaller amounts of feed (which means you buy less grain). They don’t scratch through the feed, wasting it, by kicking it out of the feeder. They are generally more healthy with better immune systems when fed fermented feeds. Their stools are more solid with less odor. Hens will lay eggs with larger yolks and stronger shells, and production will increase.
Why is fermented feed more nutritious for our chickens? Grains have a protective coating made of tannins, phytic acid, and enzyme inhibitors. These things protect the seed until they are ready to sprout, but they also make it harder for the chicken to access the nutrients properly. Lacto-fermentation breaks down this protective coating via ‘good’ bacteria. This translates into less quantities of feed that is required to be consumed in order for the bird to gain proper levels of nutrition, which translates into monetary savings for the farmer. The bacteria used to break down the protective coating is also a probiotic for the chicken. It supports and strengthens a healthy immune system, which means the bird is less likely to develop a disease. In addition to all these wonderful health benefits, the chickens love the fermented grains and spend more time gulping them down and less time scratching them out of the feeder. For a look at a 2009 study conducted by the faculty of Agricultural Sciences of Aarhus University in Denmark concerning the benefit of feeding fermented feed to chickens, visit this link: http://www.ncbi.nlm.nih.gov/pubmed/19373724 .
Why is fermented feed more nutritious for our chickens? Grains have a protective coating made of tannins, phytic acid, and enzyme inhibitors. These things protect the seed until they are ready to sprout, but they also make it harder for the chicken to access the nutrients properly. Lacto-fermentation breaks down this protective coating via ‘good’ bacteria. This translates into less quantities of feed that is required to be consumed in order for the bird to gain proper levels of nutrition, which translates into monetary savings for the farmer. The bacteria used to break down the protective coating is also a probiotic for the chicken. It supports and strengthens a healthy immune system, which means the bird is less likely to develop a disease. In addition to all these wonderful health benefits, the chickens love the fermented grains and spend more time gulping them down and less time scratching them out of the feeder. For a look at a 2009 study conducted by the faculty of Agricultural Sciences of Aarhus University in Denmark concerning the benefit of feeding fermented feed to chickens, visit this link: http://www.ncbi.nlm.nih.gov/pubmed/19373724 .
So how do you ferment grain for your chickens? It’s easy! All you need are a container, water and grains----and you’re ready.
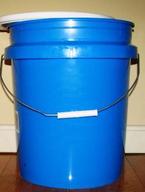
1. Choose a large plastic container, preferably food grade (BPA free). Glass will also work well, but do not use a metal container. We use a 5 gallon plastic bucket with a lid. If you don’t have a lid, you’ll need something to cover the container. In our experience, a lid is best because the idea is to provide an anaerobic environment for lacto-fermentation process. Just be sure to leave a little crack for the gases to escape the container.
2. Decide which feeds you want to ferment.
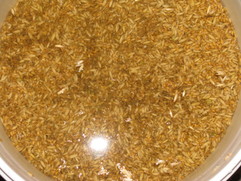
Some people will ferment commercially processed foods (chick start, layer mash/crumbles) and they work as well as grains; however, we prefer not to use commercially prepared foods and opt for organic grains. Our favorites are oats and red wheat. We have used BOSS (black oil sunflower seeds) but found it hard to keep them from floating on top of the water, so we feed the BOSS non-fermented now. Also, whole/shelled corn is difficult to keep from souring, in our experience.
3. Fill the container about 2/3 full. If using tap water, let it sit in the container 24 hours before adding the grains to allow the chlorine to evaporate. Some people will also add a starter culture to speed up the initial fermentation . We do not find this to be necessary; our grains begin fermenting within 24 hours after being submerged in the water.
4. Add your grains to the water. Make sure the grains are covered by at least 3 inches of water. Lacto-fermentation is anaerobic, meaning it’s crucial you don’t allow air to contact the grains. The grains do swell a little during the process, so keeping the water level 3 inches above at this point will ensure your grains don’t emerge into the air.
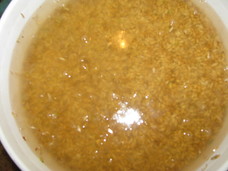
5. Place the lid/covering over the container. Occasionally (once or twice daily) stir/agitate the grains beneath the water and check to make sure the grains haven’t swollen to the surface of the water---if so, add more water. The fermentation will begin 24 hours after you submerge the grains. Evidence of the process is tiny bubbles that begin to form on top of the water.
5. Place the lid/covering over the container. Occasionally (once or twice daily) stir/agitate the grains beneath the water and check to make sure the grains haven’t swollen to the surface of the water---if so, add more water. The fermentation will begin 24 hours after you submerge the grains. Evidence of the process is tiny bubbles that begin to form on top of the water.
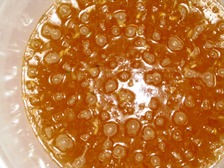
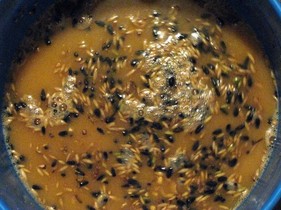
6. On the second day, the water will begin to get murky and bubbly.
You may use the grains after the initial 24 hours, when the bubbles begin to form; however, it’s best to wait until the water has turned (48 hours into the process).
You may use the grains after the initial 24 hours, when the bubbles begin to form; however, it’s best to wait until the water has turned (48 hours into the process).
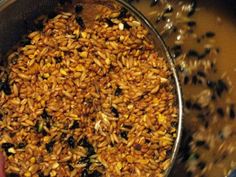
7. To feed, you may scoop both grains and water out for the chickens (be prepared to add more de-chlorinated water to your container) or you may use a strainer (as we do) to sift the grains from the water. We advise using the grains within 4-5 days of fermenting, but you can reuse the water repeatedly, as long as it doesn’t become contaminated.
Signs your batch is doing well: a sour/tangy smell similar to sauerkraut and lots of bubbles on the water surface. Signs your batch is in trouble: a rotten stench, a yeasty/alcoholic smell, or evidence of mold. If your batch is starting to smell yeasty or alcoholic, you may be able to save it by adding apple cider vinegar (ACV) with the mother in it, at the rate of a half of a tablespoon per 1 gallon of feed. The ACV should consume the alcohol, giving the good bacteria time to reestablish. If your batch smells rotten or you see mold, it’s best to toss that batch and try again. Chickens shouldn’t be fed spoiled or moldy feed.
You should also keep in mind that unless you’re fermenting a commercially prepared feed, you’ll need to add other feeds along with your fermented grain. We add mealworms and duckweed for protein, as well as several other grains for other vitamins and minerals. For a look at what works for us, refer to our February and March blogs, Producing Your Own Chicken Feed, Parts 1 & 2.
So there you have it! With minimal effort, you can have a happy, healthy and productive flock through lacto-fermentation. And it isn’t just chickens who will benefit---you can feed this to any of your fowl.
 RSS Feed
